A Complete Guide to Connecting GoHighLevel with Claude Code, Cursor, and Gemini CLI
Learn how to connect GoHighLevel to Claude Code, Cursor, and Gemini CLI using the official MCP server. Step-by-step setup, copy-paste JSON configs, and troubleshooting for agency owners.
You can connect GoHighLevel to an AI agent in under 15 minutes. Once connected, you can type plain English commands and have the agent read contacts, update pipelines, pull conversation history, and book appointments all without touching the GHL dashboard.This guide cuts straight to the steps. No fluff. No theory. Just the configuration that works.
What You Are Actually Building
The Model Context Protocol (MCP) is the standard that lets AI agents talk to external tools. Think of it as a universal plug that connects any compatible AI agent to any compatible service. GoHighLevel now runs an official MCP server at https://services.leadconnectorhq.com/mcp/. Once your agent is pointed at that URL with the right credentials, it gains direct read and write access to your GHL sub-account.
The three agents covered in this guide are:
Claude Code: Anthropic’s terminal-based agent, best for power users and no hard tool limits
Cursor: The AI-native VS Code fork, best for developers who live in an IDE
Gemini CLI: Google’s command-line agent, best for Google Cloud users
All three support the same underlying MCP standard, so the GHL connection works the same way across all of them. Only the config file location changes.
Phase 1: Get Your Two Keys from GoHighLevel
Before touching any agent config, you need two things from GHL: Private Integration Token (PIT) and your Location ID. This takes about five minutes.
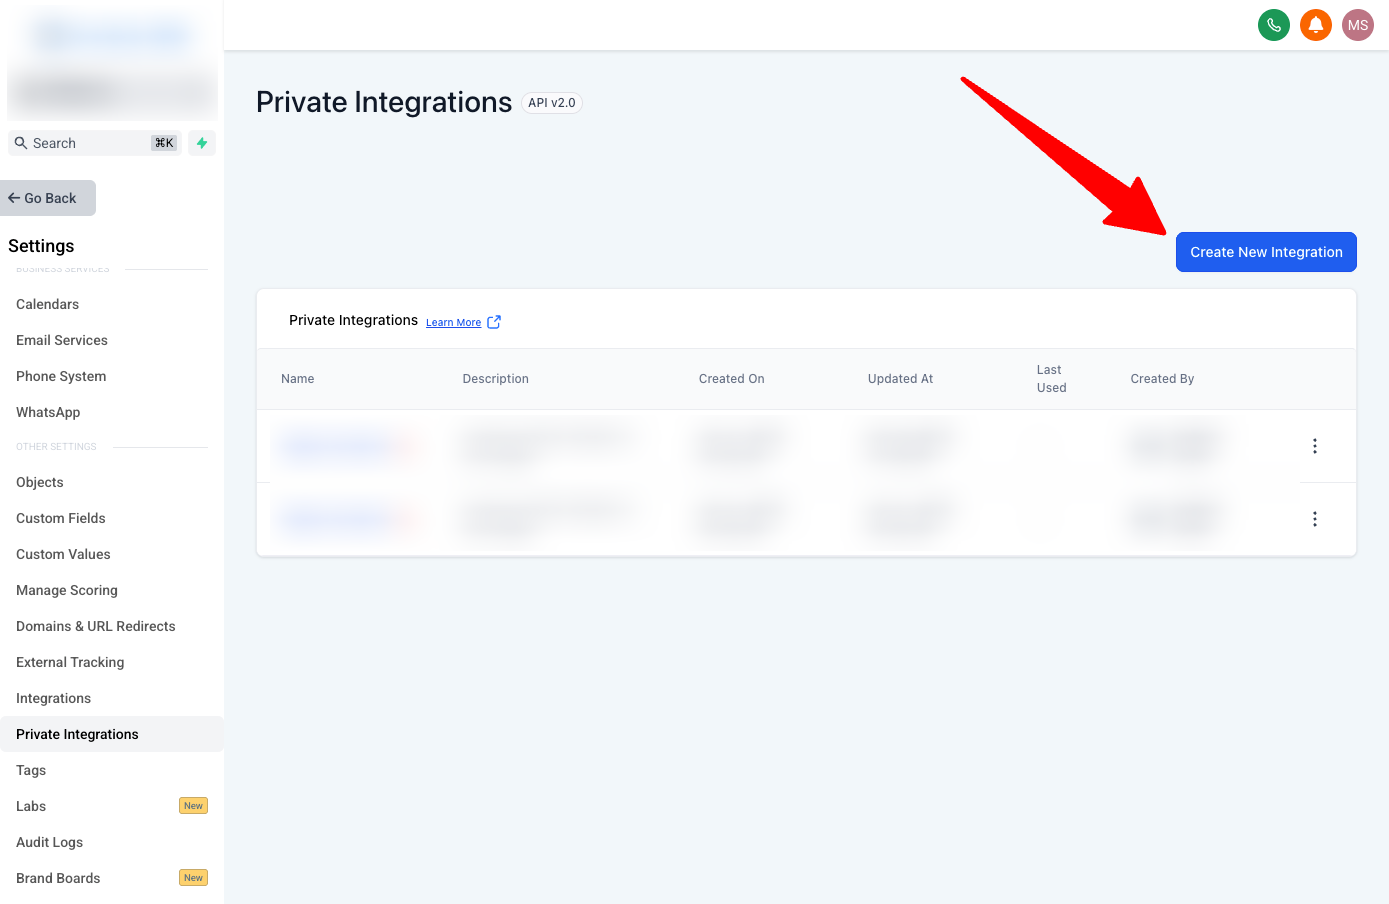
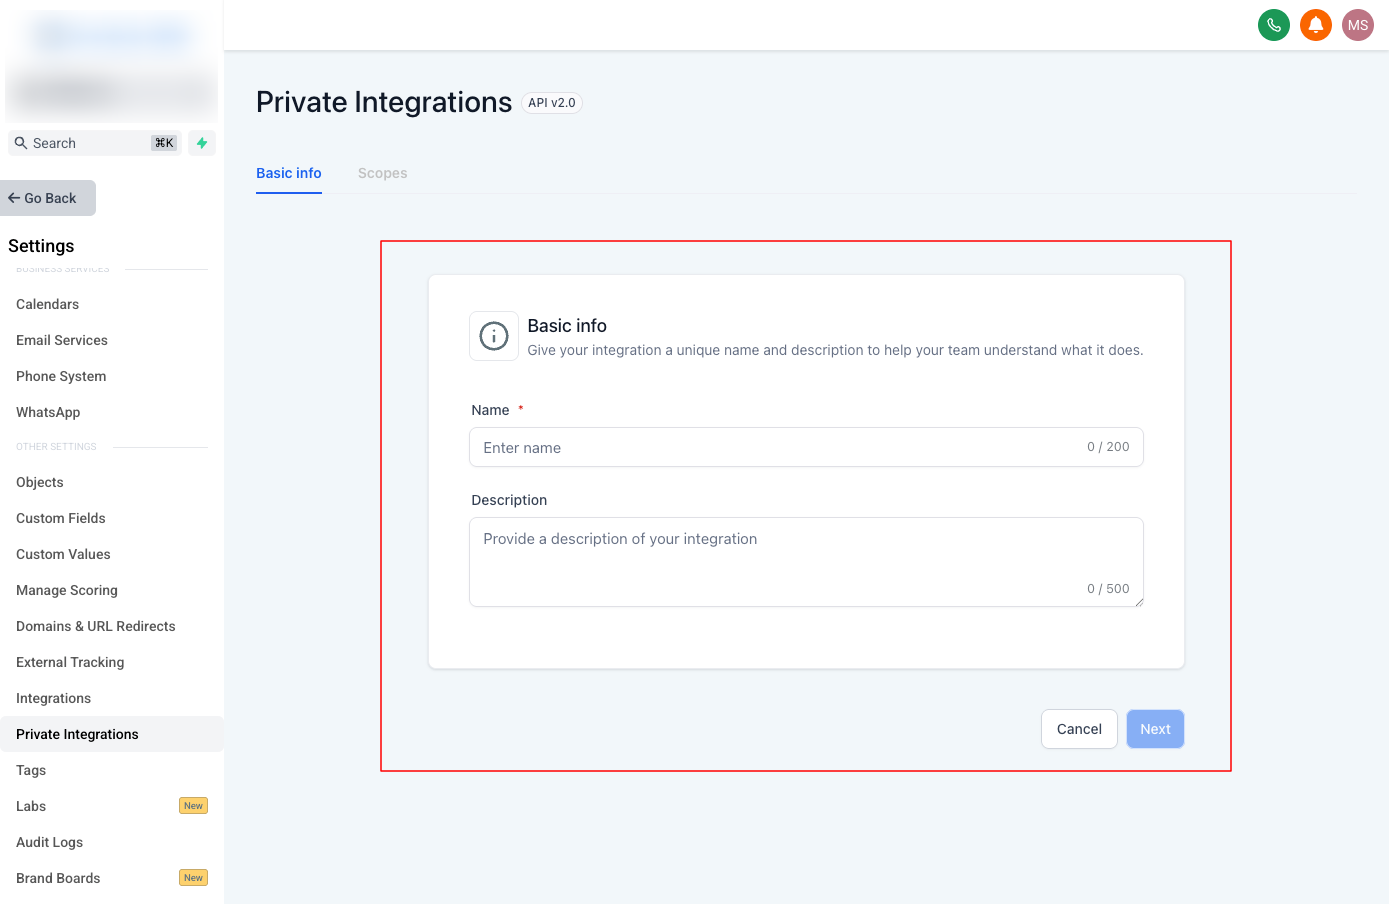
Step 1: Create Your Private Integration Token (PIT)
Go to Settings > Private Integrations
Click “Create New Integration”
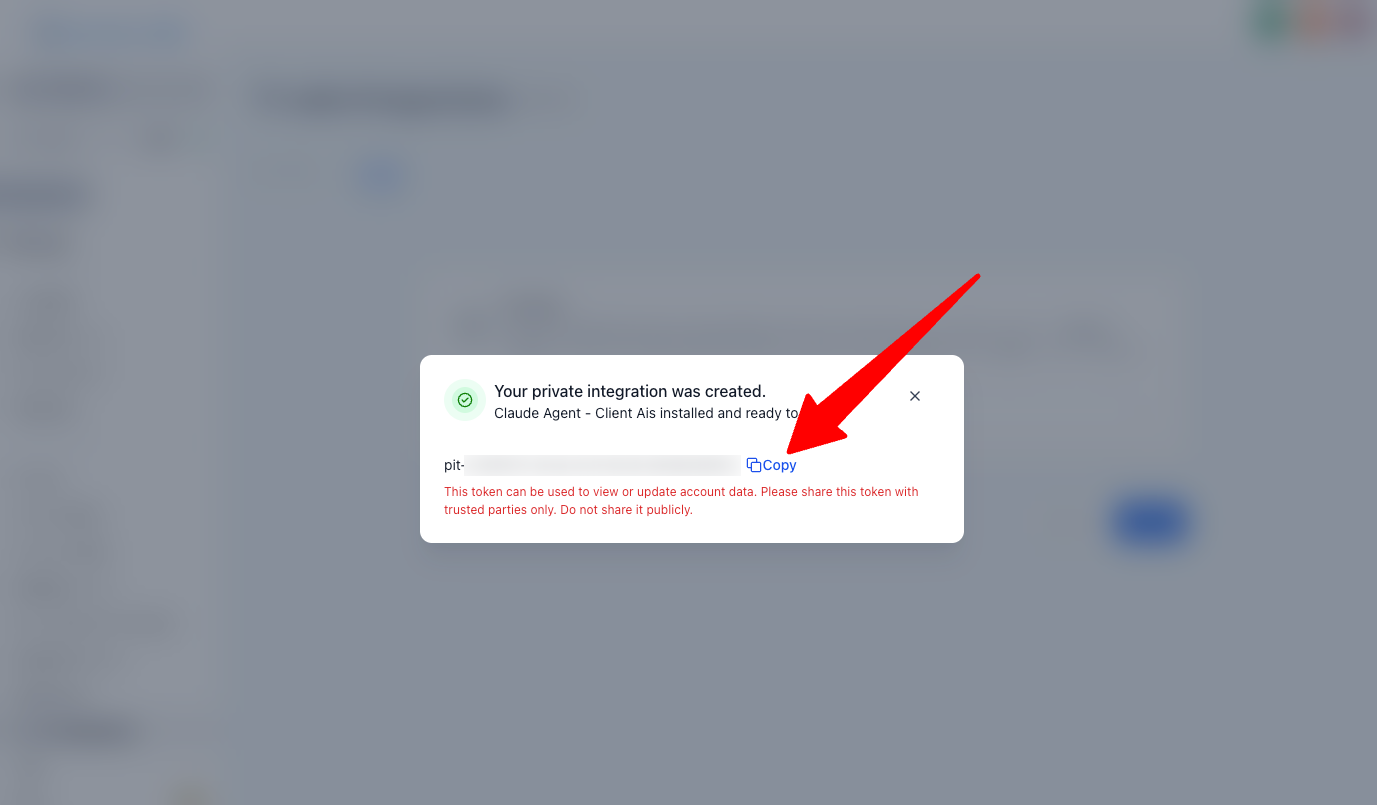
Give it a descriptive name like Claude Agent - Client A (this name appears in your API logs, so be specific)
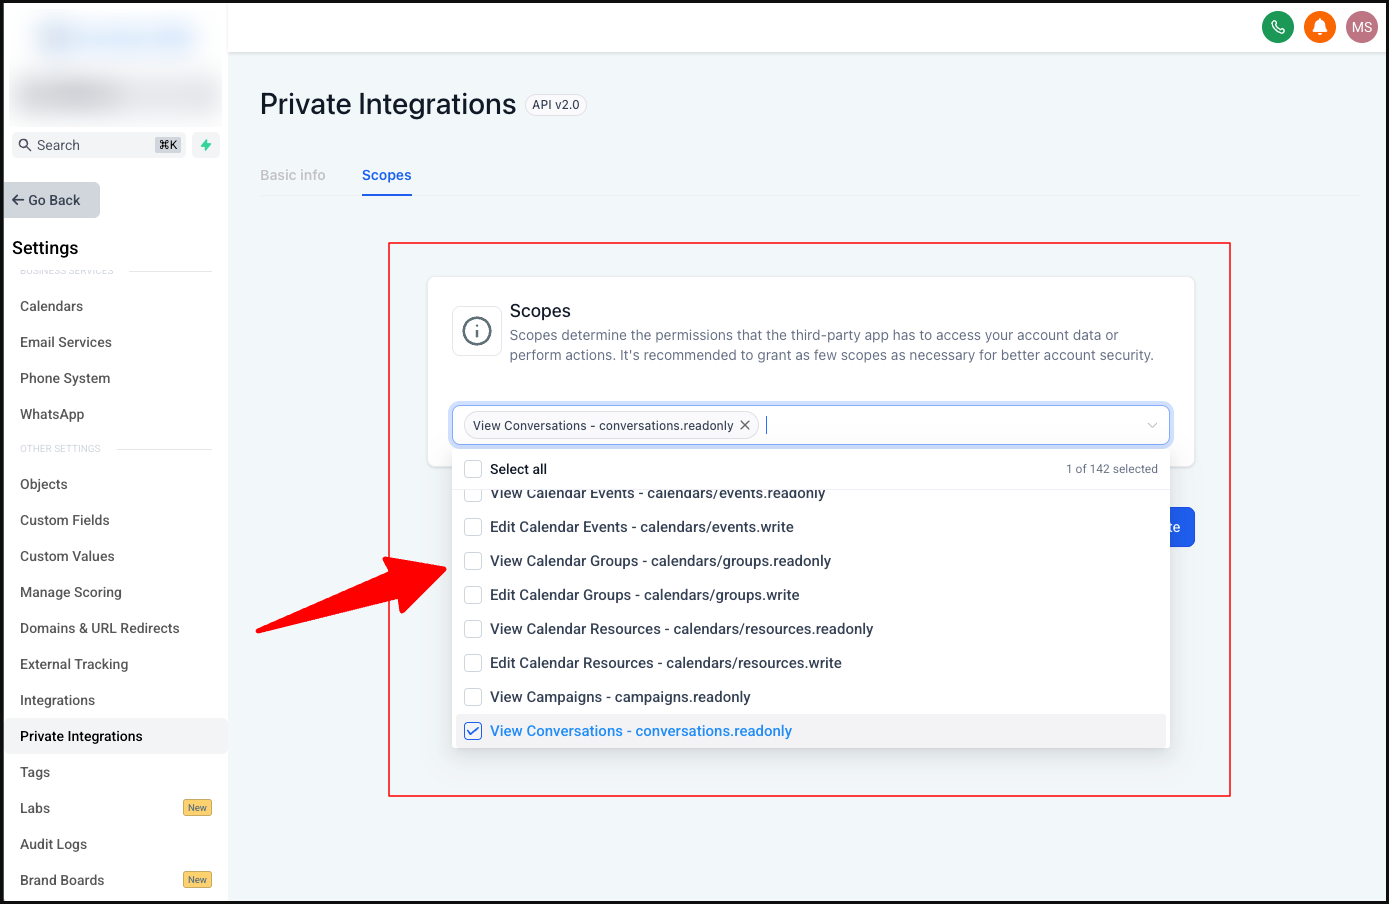
Select the scopes your agent needs (see the permissions table below)
Click Create
Copy the token immediately. It is shown only once. Store it in a password manager or .env file right now.
Recommended scopes for a general-purpose AI agent:
What You Want the Agent to Do
Scopes to Check
Read and search contacts
View Contacts
Create contacts and add tags
Edit Contacts
Read and update pipeline deals
View Opportunities, Edit Opportunities
Read conversations and messages
View Conversations, View Messages
Send messages
Edit Conversations, Edit Messages
Book appointments
View Calendars, Edit Calendar Events
Read payment orders
View Payment Orders, View Transactions
Start with only the scopes you need. You can always add more later. Granting every scope to an agent is a security risk.
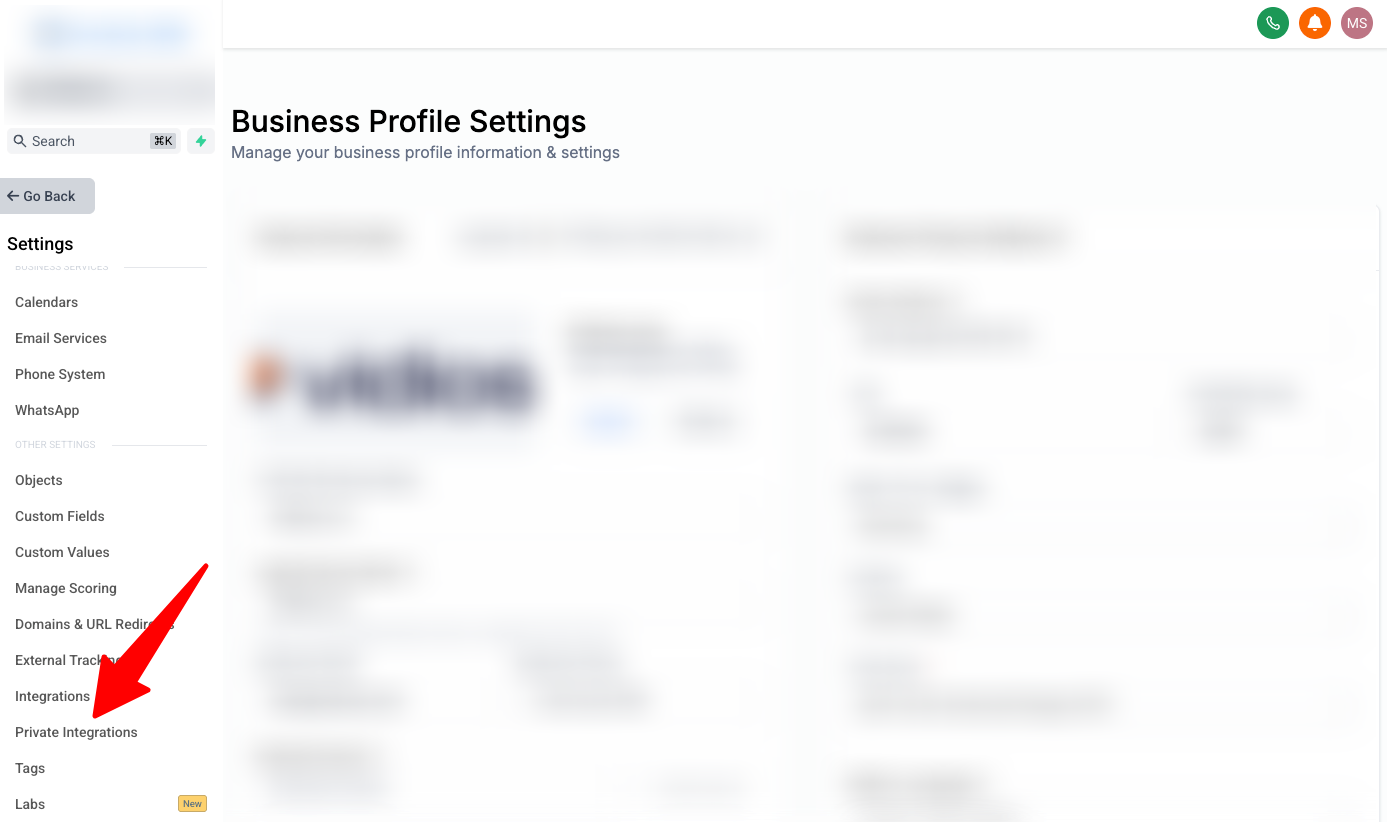
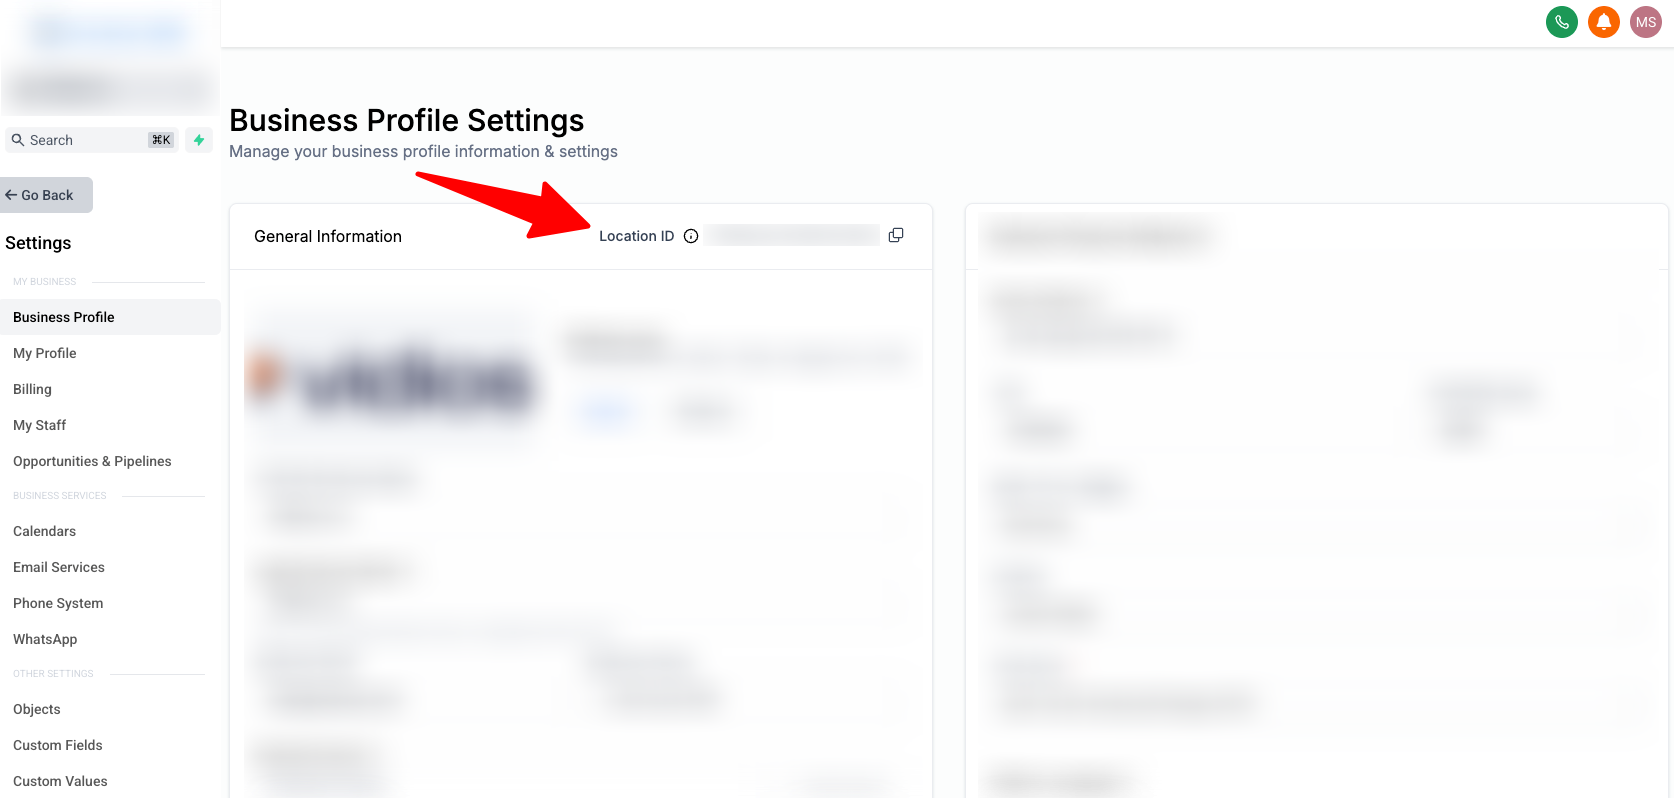
Step 2: Find Your Location ID
Your Location ID is the unique identifier for the sub-account you want the agent to operate in.
Stay inside the sub-account (not the agency view)
Go to Settings > Business Profile
Scroll to the bottom you will see a field labeled Location ID or Business ID
Copy that value (it looks like: VuWT1234abcd5678efgh)
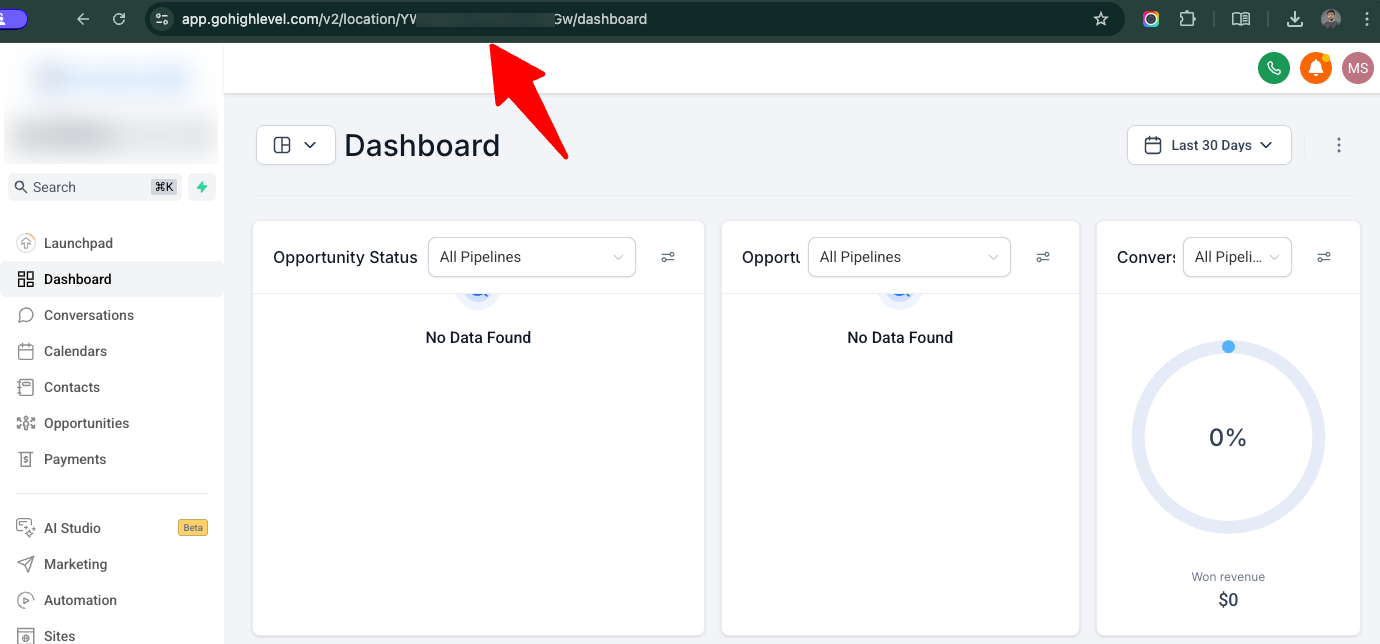
Alternatively, look at your browser URL bar when inside any sub-account page. The Location ID is the long alphanumeric string in the URL path.
You now have everything you need. Keep both values handy for the next phase.
Phase 2: Connect Your AI Agent
Pick the agent you use. Each section below is self-contained.
Claude Code
Claude Code stores its MCP configuration in ~/.claude.json. The fastest way to add the GHL server is with a single terminal command.
Option A: Terminal Command (Recommended)Open your terminal and run:
Replace YOUR_PIT_TOKEN and YOUR_LOCATION_ID with your actual values.
Option B: Manual JSON ConfigIf you prefer to edit the config file directly, open ~/.claude.json (create it if it does not exist) and add the following block inside the mcpServers object:
Managing Multiple Client AccountsClaude Code supports project-level MCP configs through .mcp.json files placed in the project root. Create a separate folder for each client, drop a .mcp.json inside with that client’s PIT and Location ID, and Claude Code will automatically scope to the correct account when you cd into that folder. This prevents any cross-contamination between client CRM data.Verify the connection by opening Claude Code and typing: /mcp. It should list ghl-mcp as a connected server with its available tools.
Cursor
Cursor stores MCP configuration in ~/.cursor/mcp.json (global) or .cursor/mcp.json inside a project folder (project-specific). The project-level config is ideal for agencies. You can commit it to a Git repo so all team members share the same setup.
Step 1: Set your environment variableAvoid hardcoding your token in any file that could be checked into version control. Set the variable in your shell profile first.For macOS/Linux, add this line to ~/.zshrc or ~/.bashrc:
export GHL_PIT_TOKEN="YOUR_PIT_TOKEN"
Then run source ~/.zshrc (or restart your terminal).
Important note for macOS users: If you launch Cursor by clicking its dock icon rather than from the terminal, environment variables set in your shell profile may not load. If the token does not resolve, launch Cursor from the terminal with open -a Cursor or hardcode the token temporarily while testing.
Step 2: Add the MCP configOpen or create ~/.cursor/mcp.json and paste the following:
Replace YOUR_LOCATION_ID with your actual Location ID. The ${env:GHL_PIT_TOKEN} syntax tells Cursor to pull the value from your environment variable at runtime.
Step 3: Verify in Cursor Settings
Open Cursor
Go to Cursor Settings > Tools & MCP
Look for ghl-remote with a green “Connected” indicator
If it shows a red or disconnected status, restart Cursor completely (not just reload the window) and check that your environment variable is set correctly.
Tool limit note: Cursor caps active MCP tools at roughly 40 to 80. If GHL’s full tool list pushes you over this limit, disable tools you do not need directly in the Cursor settings panel.
Gemini CLI
Gemini CLI centralizes its configuration in ~/.gemini/settings.json.
Gemini CLI supports both $VARIABLE (POSIX) and %VARIABLE% (Windows) syntax for environment variable expansion. Set GHL_PIT_TOKEN in your shell profile the same way described in the Cursor section above.Verify the connection by typing /mcp inside any Gemini CLI session. It returns a full list of configured servers, their connection status, and every tool available for that session.
Phase 3: Put the Agent to Work
Once connected, you interact with GHL entirely through natural language. Here are five prompts you can use immediately to validate the connection and get real work done.
1. Pull recent leads and summarize their activity
Find the last 5 contacts tagged "New Lead" and give me a one-sentence summaryof their most recent conversation message for each one.
2. Update a deal stage after a sales call
Find the opportunity for Sarah Johnson and move it to the "Proposal Sent" stage.Add a note that says "Proposal emailed after discovery call on [today's date]."
3. Book an appointment for a contact
Check available calendar slots for the "Sales Calls" calendar this week andbook the first available 30-minute slot for contact john.doe@example.com.
4. Audit unresponsive leads
Search for contacts with the tag "Hot Lead" who have had no outbound messagesin the last 14 days. List their names, phone numbers, and last message dates.
5. Create and tag a new contact
Create a new contact with the name "Marcus Webb", email marcus@webb.co,phone 555-201-3344, and add the tags "Inbound" and "Free Trial."
These prompts work across all three agents. The agent interprets your intent, selects the correct GHL tool, and executes the API call on your behalf.
Why It’s Not Working: Troubleshooting Guide
If the agent cannot connect or tools fail silently, work through this list in order.
Problem: 401 Unauthorized
Cause: The token is missing, malformed, or the Bearer prefix is absent.
Fix: Confirm your header is formatted exactly as Authorization: Bearer YOUR_TOKEN with a space between “Bearer” and the token. Confirm the token was copied in full — they are long strings and it is easy to miss the last few characters.
Problem: 403 Forbidden
Cause: The PIT is valid but lacks the scope required for the action the agent attempted.
Fix: Go to Settings > Private Integrations, open your integration, and check that the relevant scope is enabled. For example, if the agent fails when trying to send a message, you need both “Edit Conversations” and “Edit Messages” checked. Save the integration after adding scopes. The token does not need to be regenerated.
Problem: 404 Not Found
Cause: The agent is referencing a contact ID, opportunity ID, or other resource that does not exist in the sub-account tied to your Location ID.
Fix: Confirm your Location ID matches the sub-account you expect the agent to operate in. A common mistake is using the agency-level ID instead of the specific sub-account ID. Also confirm the record actually exists. Deleted records return 404.
Problem: The token literal ${env:GHL_PIT_TOKEN} appears in requests instead of the actual token (Cursor on macOS/Linux)
Cause: Cursor was launched from a desktop icon and did not inherit your shell environment variables.
Fix: Launch Cursor from the terminal: open a terminal window, navigate to your project folder, and type cursor . to open it. Alternatively, paste the token directly into the config file during testing (never commit it to Git).
Problem: “Ambiguous Location” error or agent reads the wrong account’s data
Cause: The locationId header is missing from the config.
Fix: The locationId is technically optional in the MCP spec, but GHL requires it for any sub-account-specific data. Add it to your headers object explicitly. Do not rely on passing it through prompts. Hardcode it in the config for the specific client folder or config file.
Problem: Agent fails immediately on startup with a 429 error
Cause: When an agent initializes, it fires a rapid sequence of requests (initialize, list tools, etc.) that can briefly trigger GHL’s burst rate limit of 100 requests per 10 seconds.
Fix: Restart the agent session. A single clean restart usually clears this. If it happens consistently, reduce the number of active MCP servers to lower the initialization request count.
Problem: You are using a v1 API key instead of a PIT
Cause: GoHighLevel’s legacy v1 API keys have been deprecated. Any integration built before mid-2024 using these keys will fail.
Fix: Generate a new Private Integration Token through Settings > Private Integrations as described in Phase 1. Remove any old API key from your config and replace it with the new PIT.
Token Rotation: Keep Your Integration Secure
GHL recommends rotating PITs every 90 days. Here is how to do it without breaking your agent:
Go to Settings > Private Integrations
Click the integration and select “Rotate”
Choose “Rotate and expire later”. This keeps the old token valid for 7 days
Copy the new token
Update the token in your config files for Claude Code, Cursor, and Gemini CLI
Verify each agent reconnects successfully
After 7 days, the old token expires automatically
If a token is ever compromised, use “Expire now” instead. This immediately invalidates the old token. Update all your agent configs right away or the agents will go offline.
Summary: What You Need, Where It Lives
Item
Where to Find It
Where It Goes
Private Integration Token (PIT)
GHL > Settings > Private Integrations
Authorization: Bearer header
Location ID
GHL > Settings > Business Profile
locationId header
Claude Code config
~/.claude.json
mcpServers.ghl-mcp block
Cursor config
~/.cursor/mcp.json
mcpServers.ghl-remote block
Gemini CLI config
~/.gemini/settings.json
mcpServers.ghl-gemini block
MCP endpoint
https://services.leadconnectorhq.com/mcp
url field in all configs
Required API version header
2021-07-28
Version header in all configs
Once this is set up, your AI agent operates GHL like a member of your team who never sleeps, never forgets a follow-up, and never fat-fingers a pipeline stage. The setup takes 15 minutes. The time it saves compounds daily.
Need Help with the Setup?
If you run into any issues during configuration or simply want a professional team to handle the implementation for you, we are here to help. Feel free to contact us. We have already implemented this setup for ourselves and several clients.